Friday, April 24, 2015

Welcome Baby w/ "Swing Star Boy"

This week over at Mo's Clubhouse blog we are throwing our lovely DT member Francesca Franz a VIRTUAL BABY SHOWER to celebrate the birth of her precious little boy Filippo. In celebration everyone on the DT team has created a Baby Shower Card for Franz... This is mine!!
 I've used the cosmically cute "Swing Star Boy (s)" for my image by the fabulous Mo Manning. A sentiment (shown inside the card) is include when you purchase this digital image. 
A female version is also available HERE
Image has been coloured in Polychromo Pencils.
I have surrounded this little fellow with golden stars hung from strands of twine!! :) The background papers are from the NitWit Collections


Card Ingredients:
Coloured In Polychromo Pencils
Stars hung with Twine
Star Paper from my stash.  

I hope you have enjoyed my little card this week for our Virtual Baby Shower. Don't forget we have a Baby Shower Contest running at the moment on Mo's Clubhouse Blog, so pick a Mo Manning baby image and enter a card to win a Mo Manning Rubber Stamp!!

Happy Crafting Xo
Amanda


Friday, April 17, 2015

"Baby Shower" For Someone Special

Someone very close and special to me is having her first baby... and so OF COURSE I was going to make her a card!!! I mean, what kind of a dodgy friend would I be if I didn't make her a personalised AMANDA card... with a Mo's image.. Of Course!!

Today I have used the simple but lovely "Baby Shower"... It's quite an obvious choice.. seeing it's a Baby Shower I'm attending... and this is a Baby holding an umbrella!! I love how this image is kinda gender neutral, so you can colour her/him up any way you want to make it a boy or a girl...

I've been inspired by another DT member, the Lovely Kim Bell, to get out my Distressed Inks and have a bit of a paint this week, but of course.. it wouldn't be me at the moment, unless I added Polychromo pencils SOMEWHERE!!LOL.. and because they both use the exact same paper type, my Arches 300gsm Hot press Smooth Water colour paper.... Phew.. what a mouth full... they worked EXTREMELY well together.. as you can see by the final picks.. The hair has been done in Polyies, as well as the green spots on the Umbrella and the background base grey's. :) So expect to see more combo distress ink and Polyies from me in the future... or Polyies and Copics... because I REALLY have to get some more practice in with them before I forget for to use them all over again!! LOL

So anyhoooo .... onto my card!!


Card Ingredients:
Painted/Coloured in Tim Holtz Distress Reinkers and Polychromo Pencils
Elements Distressed in Tim Holtz "Vintage Photo" and "Tea Dye" Distressed Inks
All Elements cut out using my Silhouette Cameo... I LOVE MY CAMEO!!!
Card is a 15.5x15.5cm Pre-Brought Kraft Card
3D Dimensional Foam pads 

Well that's it for this week peeps. Hope to see you next week!!
Thanks For stopping by... Happy Crafting!!
Xo


Friday, April 10, 2015

Bip Bip Birthday Tag

Hello Everyone... Well this has been ONE EXHAUSTING WEEK!! I took my not so little boy (15yo) camping for the Easter weekend on my own, and because of my chronic illness, even though I'm doing well at the moment, it took a lot more out of me than I expected...so I've had a lot of sleepy days since, and barely enough energy to get out of bed let alone move off the couch! so I will apologise to you right off the bat for this really short blog post... and also for the super poor quality of my photo... I was not even sure I'd be able to finish a piece for the weekly inspiration, but I have managed!!! Unfortunately it's NIGHTTIME and so I had no natural light to take a photo light I normally do.. So if you just tolerate the cruddy photo for a half a day... I promise in the morning, bright and early I'll take some better photos and post them!!! :) As promised, I'm back and have upoloaded the new photos... but have left the old photo below as an illustration of POOR PHOTO SKILLS!! lol...

So without any more waffling! Here's my gorgeous tag, using "Bip Bip Birthday"... a Super cute little Robot by Mo Manning.. of course!!


Now This is the OLD NIGHT TIME PHOTO!! I've left it here to illustrate just how much a difference  your photograph of your piece can make. In the above pictures the image is clear and crisp, the colours stand out and are bright and actually reflect how the true colours I how I coloured this little cutie!! You can see the Bluish tinge I placed on much of his metal body.... As you can see in the below picture the image is dull, with an orange/brown cast that I could not get ris of with photo manipulation.. it was the overhead "warm lighting" from our lightbulbs... this interfers with the colours drowning out certain colours, and making others just look plain wrong... The photo itself is also grainy! and it's not that I am poor at taking photos, just there is not enough natural lighting, and you should never use flash photography were photographing your cards, because it bounces of the the weirdest places, like the sheen of your PENCILS!! or the alcohol in the your copics make the ink from the printer shiny, so it bounce off there... and thats without considering all of the BLING some people put on there pieces... So my advice... if you have the ability to, take your photos in a light filled room, not in direct sunlight, on a consistent background.
I use just a plain piece of white cardstock A1 size, folded in half sitting on a chair in my BATHROOM!!! because the light is filtered through the rippled glass in the window.
I take MANY SHOTS, from MANY different angles.
Then they all get uploaded into my computer where I use Picassa to weed out the cruddy shots, then I crop them to size and colour correct any that are too blue!... now this is also A MUST!! every camera, whether is be a mobile or an SLR fancy smancy camer will have flaws, and most photos will need colour correction. so have a play with the programs you have and see what you can achieve with your photos. Usually mine will require the blue tinit to be corrected to slightly more yellow, an issue particule to my mobile phone camera, slightly more shadowing, and then slightly more highlight. Then it resembles as close as I'm going to get it to what I ACTUALLY PAINTED in real life!!
Anyhooo.. This wasn't MEANT to be a photography lesson.. LOL.. I will do a tutorial on this at some stage!! :)

Card Details:
Coloured in Polychromo Pencils
Digital Papers and Embellishments is a Digital Scrapbooking Kit "FBQ - Some Assembly Required" by Nitwits Collections
Tassel I made from some cross stitch thread I had laying around! :)

Thanks for Popping By
Happy Crafting
Xo

Friday, April 3, 2015

Mushroom Forest Pop up - Featuring Amanita in Polychromos

Hello... well it's Good Friday here in Australia, (Thursday everywhere else, Timezones are such whacky things!!) and so not being religious myself...I just wanted to wish everyone this coming weekend a Merry Easter Egg!! LOL... I hope you eat lots of chocolate and get to visit with lots of friends and family and have a merry old time.

Now lets get onto my card... This week I had SO MUCH FUN!!! I got playing with my PENCILS AGAIN!!! whooooo hooooooo!!! I LOVE MY POLYCHROMOS!!! so if anyone is one the fence about buying pencils, or are tossing up about which brand.. one.. GET OFF THE FENCE and get your beehind into the art store and go buy some.. they are soooo much fun.. and too, BUY POLYCHROMOS!! you will not regret it!! Anyhoooo.. a little off track. teehee... I do that.. sometimes.. :/

So I finally got to play with what I will now and forever more affectionately call my Polys on an image that was not an Animal!!, Yep I had to have more then just blending skills... LOL, and did I have a little gem to play with. I've had this image stashed away for quite some time, and I'm so glad I waited to use her... and I think you'll just LOVE what I did with her, cause I had some FUN!!!
I "GUESS" I'll maybe show you the card then shall I... *Great big cheeky smile*
I MADE A POP UP MUSHROOM FOREST!!!... oh crud.. I just realised the heading of the post kinda gave it away... Oh well... ITS STILL SUPER COOL!!!. 
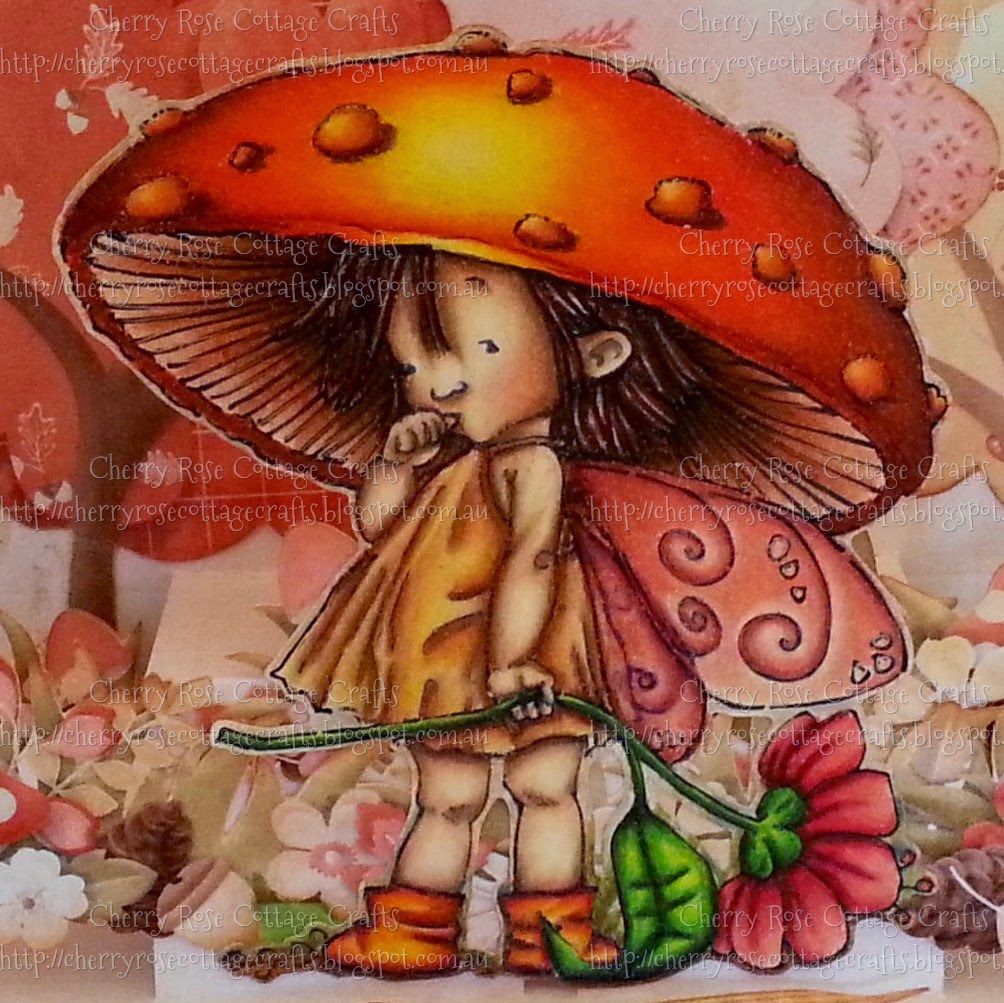
Isn't "Amanita" the Toadstool Baby Fairy just the sweetest!!! You can purchase here from Mo's Digital Pencil... Just follow THIS LINK!!! Here.. I'll give you a closer look at her CUTENESS!!! 
I've coloured her completely in Polys (Polychromo Pencils) without any blending fluids of paint thinners... This is just pencil on pencil and LOTS OF LAYERS and BLENDING!!! and yes... my hand is all crampy and feels like an eighty year old with arthritis now.. apparently I need to develop "a pencils hand"... I think I just need to chop it off.. LOL
http://www.mosdigitalpencil.com/amanita/
Anyhoo.. I better go back to the start... and show you the front cover, and then I'll let you have a look at some more picies and angles. 


Isn't is JUST ADORABLE!!!

Now for all the details, I'm sure you would like...
Digital image by Mo Manning called "Amanita" 
Polychromo Pencils used to colour image. *I have collected the list of pencils used, but will post in another blog, as I lost the bit of paper!! :(
Digital Scrap booking paper and paper embellishments from NitWit Collections called "FQB - Thicket Collection"
Pop up Card is an SVG file by Lori Whitlock called "a2 baby boy blocks pop up card" *I have altered this design to fit my purpose
3D dimensional Pop Dots used to add dimension to pieces
Tim Holtz Tea Dye Distressed Ink used on edges of paper. 
Silhouette Cameo used to fussy cut all of my pieces!! YAY FOR NOT MORE FUSSY CUTTING!!!

So I think that's it! 
Thank you for popping by. I hope you enjoyed looking at my card and that it inspires you to think outside the box with your own creations. 
Happy Crafting!!
HUGS Xo
Amanda

This Card has been entered into the following Challenges:
613 Avenue Create: Challenge #118 - Anything Goes