
Hi Again. As promised the 2nd tutorial to Photoshop (albeit a little late!! Sorry I've been a little busy). This tutorial will follow on from 'TUTORIAL: (Updated)!! How To Transform A Digi Into Greytones Using Photoshop CS2' which I hope you found helpful for all your 'No Lines' Technique stamping. It sure SAVES ON INK!!! LOL
Well this extension tutorial looks at how to use Photoshop to change your digital stamp into the OTHER colours you may want to try. Having digital stamps is so handy in so many ways, but the downfall is not being able to change up your stamping colours when you want a slightly different look, like Sepia, a soft orange/brown tone reminiscent of old world photos, giving your digi's a softer, less harsh appearance... and light blue for clouds!!!, green for grass!!! a little yellow FLUFFY DUCK!!! :) Anyhoo, you get the picture.
So lets get started!!
TUTORIAL! How to Transform A Digi Into Sepia (And Other Rainbow Colours!!) Using Photoshop CS2
Normally I'd be one to start from the very start with a program, Treating it like you have never used the program before! Seeing I have already covered this basic information on 'What the program looks like upon opening' how to 'Open a File' and 'Save a File' I won't go back over that information and BORE you!! LOL.. The only difference between these instructions is I want you to rename your file as something that reflects that your digi is COLOURED! so mine would be "gingerbread-coloured.jpg".
If you're unsure how to do these things just quickly head HERE!!! back to my last tutorial and follow the steps! and hurry back here... we will wait for you.. I promise!! *winks*.
This is where we will start. Your screen should look like this!!! Once you have opened your digital image and saved it to a new name (ignore that I have not followed my own advice). I'll once again be using our friendly little Gingerbread Man digi designed by Mo Manning which is available for free HERE!! and he's STILL waving at me!! LOL.

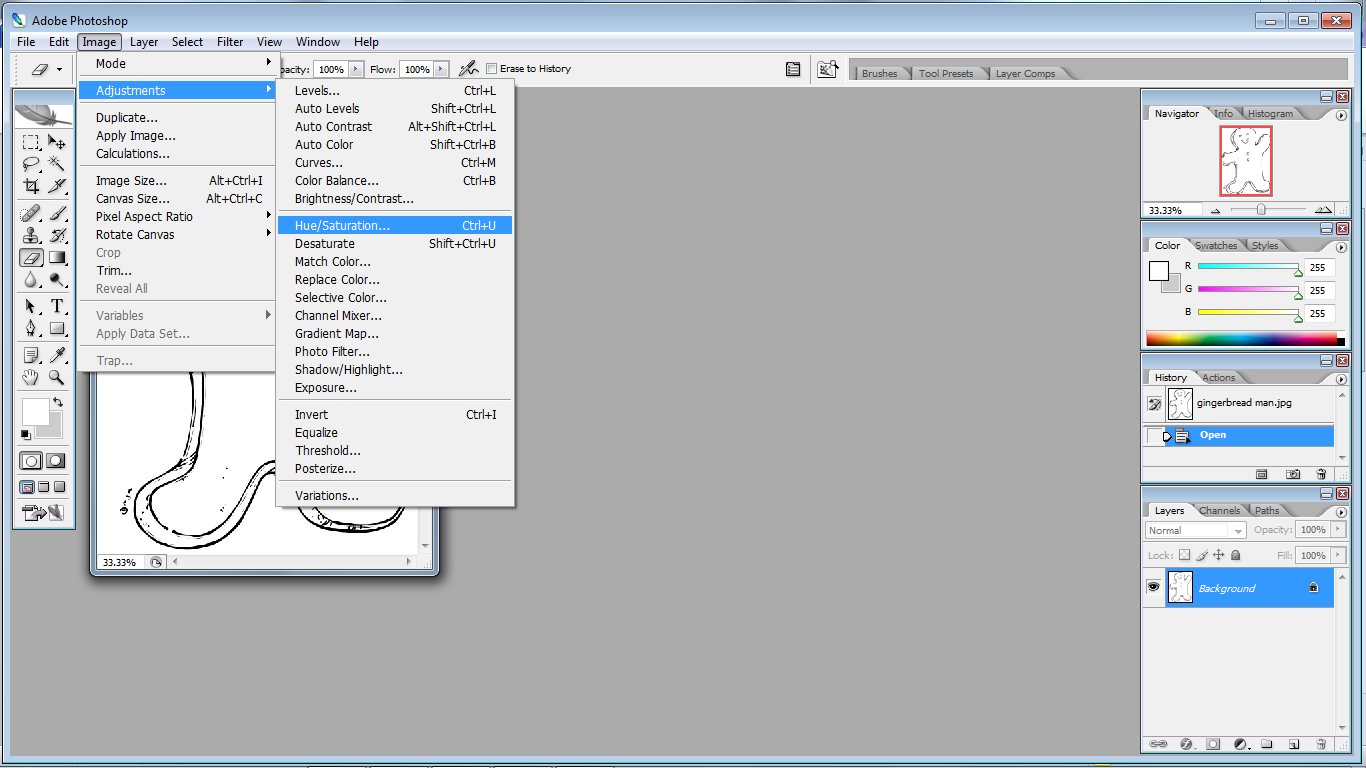
You need to go to the 'Image' tab, select "Adjustments' then select 'Hue/Saturation' as shown below. All of your colour changes occur under the main 'Image' and 'Adjustment' drop down box. For future reference when your playing!!
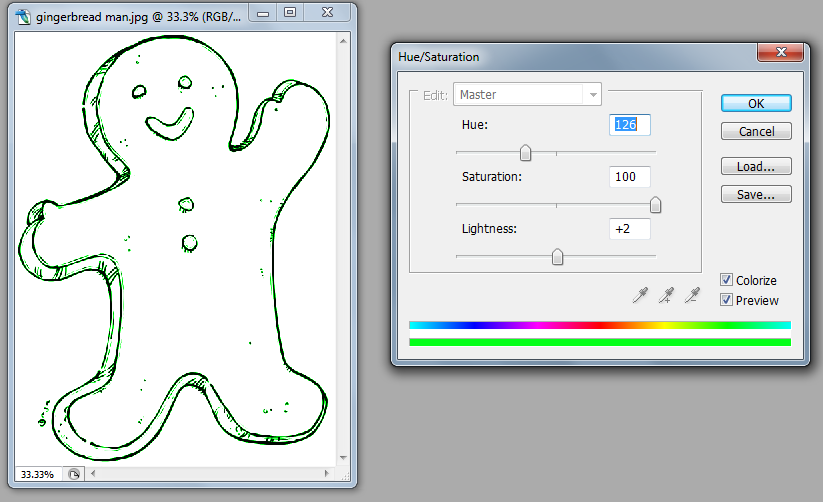
Hopefully your screen looks something like THIS!!! (see below) or else those pesky gremlins are at it again!
So In this screen there are quite a few things we can muck around with!! but the most important step is to PRESS THE COLORIZE BUTTON!!!! Which I have been ever so kind as to place a giant red dodgy looking arrow too AND highlighted in yellow in the picture below, so PLEASE don't tell me you cannot find it!! LOL
Now when you start to muck around with the values, you'll actually be changing your digital stamp!! :)

One last thing before we start mucking around with things. Just take your 'Saturation' slider and slide it ALL the way right!! OR type in 100 into the value box. This will make the next step easy for you to see the colours!!!
The first thing we will look at in this box is 'Hue'. Now Hue refers to exactly what COLOUR we want. There are two ways to change the colour in this instant, the first is by entering a number into the value box. I have placed in '126' and it's turned my little Gingerbread Man GREEN!!! Hopefully it did on yours too, if not make sure that the 'Preview' box is ALSO ticked!!
You'll notice that when you select a colour in Hue that the bottom strip (under the rainbow) will turn the corresponding colour!!!.
Now the second way you can your colour is by moving the slider, by clicking and dragging with your cursor. This will move the image through the range of colours and you'll see you image preview change in colour while your doing this.

Ok!!! Now we will play with the 'Saturation' of the image. Saturation refers to how much colour a colour contains!! I know.. sounds wonky.. but if we poured bleach over a colour, and stripped out it's colour we would be DE-SATURATING it!!! So before when I got you to put your slider at 100% it was so you were looking and working with a colour that was at it's 100% purest colour with NO de-saturation!!! So it's really up to you where you put this slider, and how you like your colours to be. Once again there is two options for changing the colour, the slider and the value box, just like before. Have a play around and see what you like!! Once again you can preview the colour changes on your digital stamp OR the colour strip UNDER the rainbow strip at the bottom.

The last change to make it so the 'Lightness'. This panel effects how much light particulars are distributed throughout your colour, lightening or darkening the image. Now the difference with this option compared to the others is that it effect the WHOLE image. While you won't notice is while you are make your image lighter......

as you can see by our little PURPLE DUDE!!!! when you make the image darker, this changes the BACKGROUND of the image too... So try and stay at 0 or above!! Unless you WANT a purple background!!! Once again, you can change this by the slider or the value box. :)

One important thing to note!!! The great thing about the values boxes... Once you have found a colour combo you like, such as this Sepia Tone!!! I have just created (not quite as funky as the purple!!) Write down these values in your colouring journal somewhere for safe keeping, or take a screen shot of the page for later reference, so that NEXT TIME!!! you want to do a Sepia Toned digi, all you need to do is enter these values into the boxes and you will get this EXACT colour combo every time. :) Which is always handy!!!

Now of course remember to SAVE your fancy creations. You should have already renamed it, so it doesn't save over your original digi image!!! and if not TUT TUT!!! *gives you the STINK EYE!!* LOL go rename it now and save your creations for later use.
I hope this has helped you out. Of course this is NOT the only way to change colours on Photoshop CS2, but ONE of the ways. I hope it makes sense and if not, feel free to leave a message for me and I'll see what I can do. :)
Thanks for popping by!!
Happy Stamping!!!
Xo
Hi Amanda!
ReplyDeleteI saw your post over on Kit & Clowder and came right on over! Your tutorial is wonderful as is your coloring on those adorable images. I'm looking forward to seeing more of your work!
I'm now your newest follower & I'd appreciate you following me as well!!!
So glad to see you here!!! and thanks for following.. I'll stop on over to your blog straight away!! If you have any questions about the tutorial, or get stuck anywhere, just give me a buzz.. I don't pretend to know everything about Photoshop (not at all) but if I don't know it, I'm stubborn enough to work on it until I find the answer!! LOL... Thanks for following, and thanks for the compliment. :)
DeleteXo